HUMAN SPIKERBOX was purchased to acquire BRAIN technology. ECG data from last year's study was acquired. For the terminals, we used easy-to-use ECG probes. The operation was confirmed at first. I am glad that the application software is easy to use and filter cutting can be done with GUI.
Until recently, students and researchers considered Matlab less desirable because of its dependence on the Research environment and the speed of Mathwork development. However, with DeepLearninig itself being the Black Box and the immediacy of research time required to paddle into RedOcean, we have come to believe that I no longer have to insist on not using Matlab. So, I decided to use it at least for the time being until we could improve my skills.
Here I am going to share building an Alexnet Convolutional Neural Network for 6 different classes built from scratch using Matlab.
In this article we will use the Image Generator to build the Classifier. Next we will import the data using Image Data Generator. Before that let’s understand the Data. The dataset can be found Kaggle intel-image-classification data.
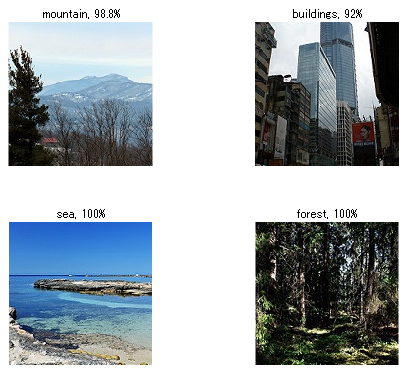
This Data contains around 25k images of size 150x150 distributed under 6 categories, namely : ‘buildings’ , ‘forest’ , ‘glacier’ , ‘mountain’ , ‘sea’ , ‘street’ . There are 14K images in training set, 3K in test setand 7K in Prediction set.
As often used., the data images for all the categories are split into it’s respective directories, thus making it easy to infer the labels.
If the AlexNet input size is 227x227, it is usually necessary to resize the image as a data preprocessing step. To change the target size to (227, 227), the python code specifies target_size as an argument to ImageDataGenerator as follows
With this modification, the flow_from_directory method and other data generation methods are used to read the image data while changing it to the specified target size.
However, this kind of hassle is also present in Matlab and is hardly a concern, and the results can be sought. The accuracy and certainty of the front-end annotations are more important for applications than the improvement in the number of significant digits of accuracy of the model.
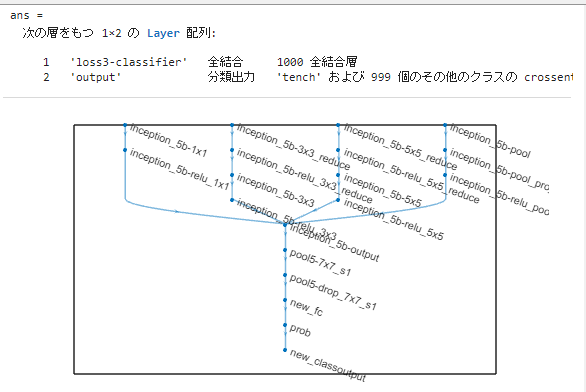
Original MatlabSample : TransferLearningUsingGoogLeNetExample.mlx
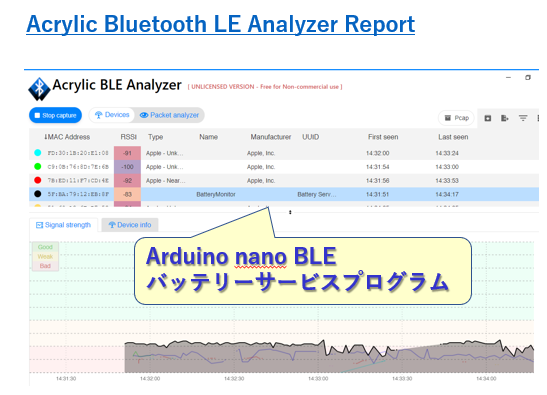
To connect with BLE, the device side (Peripheral) starts with Advertise, which emits a radio wave, the PC side (Central) scans and searches for devices in the vicinity, connects with a device with a specific address (MAC address), controls (Read, Write The sequence of events is as follows: the PC side (Central) scans for devices in the vicinity, connects to devices with specific addresses (MAC addresses), controls (Read, Write, Notify), and disconnects when the process is completed.
Low Memory Warning" warning from the system! NVIDIA's message was that it was a low-cost version, even if it was a forum! Even with the increased computing speed, the problem was the swap memory: the Jetson Orin Nano has 8GB of memory, which was not enough to hold the training data, so it had to read and write to the microSD swap memory, which took time in areas other than AI inference. It is beyond the scope of the hobbyist Sunday programmer, although it is necessary to devise programs to fit into 8GB of memory, such as by dividing data and processing it, or by other methods that aim to both lower memory usage and speed up the process. Compared to the old jetson-nano, it is not as user-friendly for the price considering the upper limit of personal spending range, and it seems to be a product that is dragging down GPU-CUDA. At this price, it is better to buy a PC, and raspi has released version 5/8G at 1/5 the price. NVIDIA's target may be the interdisciplinary research field, but I wish they would be more gentle.
I will leave you with a program that I have tested the operation of.
Incompatible versions TensorFlow, CUDA, cuDNN, and TensorRT all need to be compatible. Make sure that I am using versions of these libraries that work together. I could find this information in the compatibility matrix on the NVIDIAwebsite.
procedure
0. Update NVIDIA-HDMI display driver sudo ubuntu-drivers autoinstall 1. GTX driver download from NVIDIAwebsite 2. Get Tensorflow and other lib-configuration information by answering questions from the NVIDIAwebsite. 3. Install CUDA from NVIDIA's Base Installer. 4. Set PATH and LD_LIBRARY_PATH manually. 5. Run "pip install tensorflow[and-cuda 6. Install TensorRT, but it is not installed due to some dependency issues. 7. Memory is not enough at all. sudo fallocate -l 128G /swapfile
caution
1. recommends that everybody switches tensorflow.keras in place of plain keras.
troble issue ( Insufficient operation )
1. WARNING:tensorflow:Layer lstm will not use cuDNN kernels since it doesn't meet the criteria. It will use a generic GPU kernel as fallback when running on GPU.
2. external/local_tsl/tsl/framework/bfc_allocator.cc:485] Allocator (GPU_0_bfc) ran out of memory trying to allocate 1.89GiB (rounded to 2028265984)requested by op_EagerConst
my LSTM operation
tensorflow/core/common_runtime/gpu/gpu_device.cc:1929] Created device /job:localhost/replica:0/task:0/device:GPU:0 with 2754 MB memory: -> device: 0, name: NVIDIAGeForce GTX 1650, pci bus id: 0000:01:00.0, compute capability: 7.5